There’s something truly magical about biting into perfectly crispy, golden-breaded chicken topped with bubbling marinara sauce and melted cheese. Chicken Parmesan has become a beloved classic in American households, offering restaurant-quality flavor right from your own kitchen.

Table of Contents
Preparing the Chicken for Success
Selecting and Pounding Your Chicken Breasts
Choosing the right chicken breasts makes all the difference in your final dish. Look for chicken breasts that are roughly equal in size, which ensures even cooking throughout. Once you’ve got your chicken, it’s time to pound them to an even thickness. Place each breast between two pieces of plastic wrap or parchment paper, then use a meat mallet to gently pound from the center outward. You’re aiming for about half-inch thickness across the entire cutlet.
This step isn’t just busywork—it’s essential for several reasons. First, it tenderizes the meat by breaking down muscle fibers. Second, uniform thickness means your chicken cooks evenly, preventing those dreaded dry edges while the center is still cooking. Additionally, thinner cutlets cook faster, which reduces the risk of overcooking and helps maintain that juicy interior we’re after.
Seasoning Your Chicken Properly
Before we even think about breading, the chicken needs proper seasoning. Generously sprinkle both sides of each pounded cutlet with salt, black pepper, and garlic powder. Don’t be shy here—seasoning at this stage builds flavor from the inside out. Let the seasoned chicken rest for about 10 minutes at room temperature, which allows the salt to penetrate the meat slightly.
Meanwhile, this resting period gives you time to set up your breading station. Having everything ready before you start coating the chicken prevents messy situations and keeps the process smooth. Think of it as your cooking assembly line, and trust me, organization here pays off big time.
You may also like: Blackstone Garlic Parmesan Chicken
Mastering the Perfect Breading Technique
Setting Up Your Three-Stage Breading Station
Creating the ultimate crispy coating requires a proper three-stage breading setup. Grab three shallow dishes or pie plates and line them up. In the first dish, place your flour mixed with a pinch of salt and pepper. The second dish gets your beaten eggs—whisk them well until completely combined. For the third dish, combine your Italian breadcrumbs with half a cup of grated Parmesan cheese and the Italian seasoning.
This classic breading method creates multiple layers that lock in moisture while developing that signature crunch. Furthermore, the Parmesan in the breadcrumb mixture adds an extra dimension of savory, nutty flavor that elevates this dish beyond ordinary breaded chicken. Each layer serves a specific purpose, working together to create texture and taste.

The Breading Process Step by Step
Now comes the fun part—coating your chicken. Take one seasoned cutlet and dredge it thoroughly in the flour, shaking off any excess. Next, dip it into the beaten eggs, making sure every surface is covered. Finally, press it firmly into the breadcrumb mixture, coating both sides completely. Here’s a pro tip: use one hand for wet ingredients and one for dry to avoid the dreaded “club hand” situation.
As you bread each piece, place them on a clean plate or baking sheet. Once all the chicken is breaded, let them rest for about 5 minutes. This brief pause helps the coating adhere better during cooking, resulting in less breading falling off in the pan. It’s a small step that makes a noticeable difference in your final presentation.
Ingredients
| Ingredient | Quantity |
|---|---|
| Boneless, skinless chicken breasts | 4 pieces (about 6 oz each) |
| All-purpose flour | 1 cup |
| Large eggs | 3, beaten |
| Italian breadcrumbs | 2 cups |
| Grated Parmesan cheese | 1 cup, divided |
| Marinara sauce | 2 cups |
| Fresh mozzarella cheese | 8 oz, sliced |
| Fresh basil leaves | ¼ cup, chopped |
| Olive oil | ½ cup for frying |
| Salt | 1 teaspoon |
| Black pepper | ½ teaspoon |
| Garlic powder | 1 teaspoon |
| Dried Italian seasoning | 1 teaspoon |
Pan-Frying for Golden Perfection
Getting Your Oil Temperature Just Right
Temperature control is absolutely critical when pan-frying breaded chicken. Pour olive oil into a large skillet to about a quarter-inch depth, then heat over medium-high heat. You’ll know it’s ready when a pinch of breadcrumbs sizzles immediately upon contact. If the oil’s too cool, your chicken absorbs excess oil and becomes greasy. Conversely, oil that’s too hot burns the coating before the chicken cooks through.
Consequently, maintaining that sweet spot around 350°F gives you the best results. If you have a kitchen thermometer, use it—it takes the guesswork out of the equation. Otherwise, that breadcrumb test works perfectly. Remember, patience here prevents frustration later, so take an extra minute to ensure your oil is properly heated.
Frying Technique for Even Browning
Carefully place your breaded chicken cutlets into the hot oil, working in batches if necessary to avoid overcrowding. Each piece needs space around it for proper heat circulation and even cooking. Let them cook undisturbed for about 4-5 minutes on the first side. Resisting the urge to move them around is tough, but it’s essential for developing that beautiful golden-brown crust.
When the edges start looking golden and you can see the color creeping up the sides, it’s time to flip. Use tongs or a spatula to gently turn each cutlet, then cook the second side for another 3-4 minutes. The chicken should reach an internal temperature of 165°F. Once cooked, transfer the cutlets to a paper towel-lined plate to drain excess oil briefly before assembly.
Explore more tasty ideas here: Garlic Parmesan Sauce
Building Layers of Flavor
Preparing Your Marinara Base
While you can certainly use store-bought marinara sauce, taking a moment to doctor it up makes a world of difference. Pour your marinara into a small saucepan and warm it over low heat. Add a pinch of sugar to balance the acidity, along with some extra garlic powder and Italian seasoning. If you’re feeling ambitious, sauté some fresh minced garlic in olive oil first, then add your sauce.
This simple enhancement transforms ordinary jarred sauce into something that tastes homemade. Additionally, warming the sauce ensures it melds beautifully with the cheese during baking. A warm sauce also helps the cheese melt more evenly, creating that gorgeous, gooey layer we’re all craving in chicken parm.
Assembling Your Chicken Parmesan
Preheat your oven to 400°F while you arrange the components. In a baking dish large enough to hold all four cutlets without overlapping, spread a thin layer of marinara on the bottom. Place your fried chicken cutlets on top, then spoon generous amounts of marinara over each piece. Don’t drown them, but be generous—the sauce keeps everything moist and adds incredible flavor.
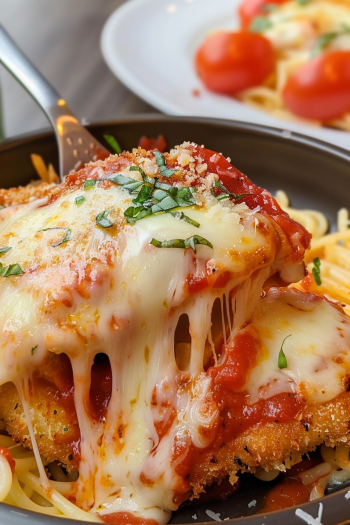
Next, layer sliced fresh mozzarella over each cutlet, followed by a sprinkle of the remaining Parmesan cheese. The combination of these two cheeses creates the perfect balance of gooey stretch and sharp, salty flavor. Finally, slide the dish into your preheated oven and bake for 15-20 minutes, until the cheese is melted, bubbly, and starting to develop golden spots.
Serving Suggestions and Pairings
Classic Italian Accompaniments
Chicken Parmesan practically begs to be served over a bed of pasta. Spaghetti or linguine tossed with a little olive oil, garlic, and parsley makes the perfect foundation. The pasta soaks up the extra marinara sauce and creates a complete meal that’s incredibly satisfying. Alternatively, you could serve it alongside creamy polenta or garlic mashed potatoes for something a bit different.
Don’t forget about vegetables! A simple side salad with Italian dressing provides a fresh, crisp contrast to the rich, cheesy chicken. Roasted broccoli, sautéed spinach, or green beans with garlic also pair beautifully. These lighter sides balance the heartiness of the main dish while adding nutritional value and color to your plate.
Wine and Beverage Pairings
If you’re serving wine with dinner, consider a medium-bodied red like Chianti or Sangiovese. These Italian wines complement the tomato-based sauce perfectly and can stand up to the rich, cheesy flavors. For white wine lovers, a crisp Pinot Grigio offers a refreshing counterpoint that cleanses the palate between bites.
For non-alcoholic options, sparkling water with lemon provides a palate-cleansing effect, while Italian sodas add a fun, festive touch. Iced tea works wonderfully too, especially if you’ve added some lemon and fresh herbs. Whatever you choose, the beverage should complement rather than compete with the bold flavors of your beautifully prepared chicken.
Storage and Reheating Tips
Proper Storage Methods
Leftover Chicken Parmesan keeps beautifully when stored correctly. Allow the dish to cool completely before storing—this prevents condensation from making the breading soggy. Transfer individual portions to airtight containers and refrigerate for up to three days. If you’ve made extra, you can also freeze portions for up to three months, though the texture of the breading may change slightly upon reheating.
When freezing, wrap each portion tightly in plastic wrap, then place in a freezer-safe container or bag. Label with the date so you’ll know when it was prepared. This way, you’ve got a delicious homemade meal ready to go whenever you need a quick dinner solution. It’s like giving your future self a wonderful gift!
Reheating for Best Results
The key to reheating chicken parm while maintaining that crispy coating is using your oven rather than the microwave. Preheat your oven to 350°F and place the chicken on a baking sheet. Cover loosely with foil to prevent the cheese from burning, then heat for about 15-20 minutes until warmed through. Remove the foil for the last 5 minutes to re-crisp the coating slightly.
If you’re in a hurry, an air fryer works fantastically for reheating. Set it to 350°F and heat for 5-7 minutes, checking frequently. This method actually restores some of the original crispiness better than traditional oven reheating. However, avoid the microwave if possible—it turns the breading soft and the cheese rubbery, which diminishes the whole experience.
Frequently Asked Questions
Can I use chicken thighs instead of breasts?
Absolutely! Boneless, skinless chicken thighs work wonderfully in this recipe and actually stay more moist than breasts due to their higher fat content. Pound them to even thickness just like you would breasts, and follow the same breading and cooking process. The cooking time might be slightly shorter, so watch them carefully and use a meat thermometer to ensure they reach 165°F internal temperature.
How do I make this recipe gluten-free?
Converting this recipe to gluten-free is straightforward. Replace the all-purpose flour with gluten-free flour blend or cornstarch, and use gluten-free breadcrumbs instead of regular Italian breadcrumbs.
Can I bake the chicken instead of frying it?
Yes, you can bake the breaded chicken for a lighter version. Preheat your oven to 425°F and place the breaded cutlets on a wire rack set over a baking sheet that’s been sprayed with cooking oil.
What’s the best store-bought marinara sauce to use?
There are many excellent options available. Look for brands like Rao’s, Victoria, or Classico that use simple, quality ingredients without added sugars or preservatives. The sauce should have a good balance of tomato flavor and herbs.
How far in advance can I bread the chicken?
You can bread the chicken cutlets up to 4 hours ahead of cooking. Place them on a baking sheet lined with parchment paper, cover loosely with plastic wrap, and refrigerate. This actually helps the breading adhere even better.
Conclusion
Creating restaurant-quality Chicken Parmesan at home is absolutely achievable with the right techniques and a bit of patience. From properly pounding and seasoning your chicken to mastering the three-stage breading process and achieving that perfect golden crust, each step builds upon the last to create something truly special. The combination of crispy breaded chicken, tangy marinara sauce, and melted cheese is simply irresistible.
Print
Chicken Parmesan
- Total Time: 55 minutes
- Yield: 4 servings
Description
Crispy breaded chicken cutlets topped with marinara sauce and melted mozzarella cheese, baked to golden perfection for an Italian-American classic
Ingredients
- Boneless, skinless chicken breasts – 4 pieces (about 6 oz each)
- All-purpose flour – 1 cup
- Large eggs – 3, beaten
- Italian breadcrumbs – 2 cups
- Grated Parmesan cheese – 1 cup, divided
- Marinara sauce – 2 cups
- Fresh mozzarella cheese – 8 oz, sliced
- Fresh basil leaves – ¼ cup, chopped
- Olive oil – ½ cup for frying
- Salt – 1 teaspoon
- Black pepper – ½ teaspoon
- Garlic powder – 1 teaspoon
- Dried Italian seasoning – 1 teaspoon
Instructions
- 1. Pound chicken breasts to ½-inch even thickness between plastic wrap using a meat mallet. Season both sides with salt, pepper, and garlic powder.
- 2. Set up three shallow dishes: first with flour, second with beaten eggs, third with breadcrumbs mixed with ½ cup Parmesan and Italian seasoning.
- 3. Dredge each chicken cutlet in flour, then egg, then breadcrumb mixture, pressing firmly to coat. Let rest 5 minutes.
- 4. Heat olive oil in a large skillet over medium-high heat to 350°F. Fry chicken 4-5 minutes per side until golden brown and internal temperature reaches 165°F. Transfer to paper towel-lined plate.
- 5. Preheat oven to 400°F. Spread thin layer of marinara in baking dish. Place fried chicken cutlets on top.
- 6. Spoon marinara over each cutlet, top with mozzarella slices and remaining Parmesan cheese.
- 7. Bake 15-20 minutes until cheese is melted, bubbly, and golden. Garnish with fresh basil and serve immediately.
Notes
Store leftovers in airtight containers in refrigerator for up to 3 days. Reheat in 350°F oven for 15-20 minutes. Can be frozen for up to 3 months. Serve over pasta, with garlic bread, or alongside a fresh green salad.
- Prep Time: 20 minutes
- Cook Time: 35 minutes
- Category: Main Course
- Cuisine: Italian-American
Nutrition
- Serving Size: 1 chicken cutlet
- Calories: 580
- Sugar: 6g
- Sodium: 1240mg
- Fat: 28g
- Carbohydrates: 35g
- Fiber: 3g
- Protein: 52g